Sunday, August 26, 2012

Seat Crates!

I have been inspired like the rest of you to create many goodies this summer. This was the last and final project....Seat Crates!
 
 
First of all...it is not as easy as it looks.  And it is not cheap...unless you are like me and find good deals!  We were lucky and had left over wood hanging around the house...so we used it! (no $)


 I also had bought the crates last year so no $ this year (but about $12). Also, I wanted to find a cheaper alternative to the seat cushions.  I found a stack of ugly cushions that were not my style on sale - 4 for $5. 


Then I found cute fabric for $5 a yard (and only used a yard!). Goes well with my color scheme (primary colors) and my theme (Space and Robots).


 I also had cute ribbon hanging around which would have been another $5 for two.  So, imagine it will cost you between $30 and $40 for four crates...


Time to make = an hour or less. I was lucky to have help from my husband with the cutting of the wood but I know other people had them do it at Lowes for them. Just make sure you measure each crate.  They may be different sizes inside if you bought them at different times.
 
Anyway...they are adorable and I love them. I hope they last the year!!!


Thursday, August 23, 2012

Do you clarify what your rules mean?

When we teach expectations, it is so important to clarify what we are looking for.  Let me share a story from my son's middle school....He was often told to be organized with his work, but never told how to do that.  So....how could he be expected to organize without support?

Fast forward to high school where they said he would have to have time management skills.  This program actually spent orientation teaching him how to manage his time by making a schedule, breaking down tasks to 2 hours a night and then actually practicing it with "pretend" assignments.  Wow...what a difference.  Now, he is prepared, confident and ready to go.

This is part of a "no secret" classroom!

Here is an example of an anchor chart that we created to show what using time wisely looks like. We broke the expectation down into meaningful tasks that actually make sense to them. 


I hope this makes sense to you...

Tuesday, August 21, 2012

Effort Based...expectations

Do you tell your students what you expect in a clear, concise and easy to follow way?

During the first six weeks, we work on creating class rules, individual goals and understanding routines and procedures.  With this in mind, I also create my own expectations that I post in the room. They are simple, but effective.


How do we do this?  Well...we take each strand and talk about what it looks like, sounds like and feels like.  Most importantly....we practice it.

How?  Morning Meetings are a great place to model what it looks like to be a good listener during share time.  I model what it looks like to be polite to my students and correct them right away when I hear them talking rudely to each other.  Work hard - well, that is where I showcase EFFORT right away.  When I see a student working hard or trying their best, I may have them....kiss their brain!
I copied this idea from www.langstonslearners.blogspot.com . I, too, have a jar of Hershey's kisses that the students can get a treat from when they work hard. 
However, word on the street is our new principal may not like us giving out candy...so I may have to switch to Smart Beads.

Smart beads
I found this on Pinterest.  I'm not sure who originally posted it, but I love it!


Monday, August 20, 2012

Effort Based Instruction...posters

Do you teach your students about Effort?  Recently I completed the Skillful Teacher training which focussed on teaching children about the correlation between effort and achievment. 

I was amazed at this simple concept and thought about how it was relative in my life.  How many of us know people,students, family members who are extremely smart...but just don't apply themselves and end up not meeting the potential they should in their adult lives? Then on the flip side, you know students who had to work hard each and every day ...and through their hard work and effort, they make great success.

I recently ran into two former students.  One was a gifted student who never had to study or put forth much effort in anything. As he grew up and realized he had to study in his highschool classes...he gave up.  A child I thought would definately go to college is now working retail with no idea what he wants to do with his future.  Again, on the flip side...a student I had who struggled with reading in 1st grade and had many tutors and support learned that if she worked hard and studied she could make good grades.  Now a sophmore in college...she dreams of being an engineer.

This week I plan to share with you several resources for teaching your students to put forth their best effort in the classroom. 

Today, I am sharing Effort Based Expectations and Motivational posters for FREE. 


Here is what they look like in my classroom.


I hope you can use them!


Sunday, August 19, 2012

Job Charts


There were many years when I spent hours and hours planning a cute display to show jobs for my students.  I would buy or create something "cute" that took up a ton of space. 

That was then, this is now.  NOW...I need more SPACE for ANCHOR charts.  So, a couple of years ago I decided to simplify. 

Let me back it up a bit...first of all, I believe that ALL students should have a job.  Everyone needs to have a sense of purpose in the classroom and giving them jobs gives them specific responsibilities.  I also try to make sure that the jobs are truly jobs that need to be done in the classroom - not made up time fillers.  For example, at our school it is a RULE that someone needs to check the teacher mailboxes at 3:15...so that is an assigned job.  Similarly, we all need people to wipe the tables at lunch and help with recycling.  Someone should walk the lunch count to the cafeteria in the morning and another person can walk the attendance to the office.  We need people to sweep the floor and people to hold the dust pan.  We also have a job to write the date, to change the schedule, to write the question of the day, and to calibrate the smart board.

See???? That's a lot of jobs!


I
Another idea I heard from someone (I don't even know who now!!) is to have a substitute position.  So if someone is absent, you already have a backup plan to take over for them that day.  If I run out of jobs (which is unusual) I have a job that says "Vacation"...which means that they have the week off.  
How do I manage this?
Simple...I put the jobs on labels and then create cards (in another color) with labels that have the students names or numbers.  Every Monday I rotate jobs - simply move the cards down a slot.  It's easy! You can even assign the job to a student you trust!

What do I use? I use a pocket chart and duct tape it to the wall...simple, yet efficient!

If you are looking for a list of possible classroom jobs, you can click on my list here for FREE. I'd love to hear how you keep track of class jobs, too!


Friday, August 17, 2012

Including your students in Creating Rules...

I love this book.  I really do!  This book is a great resource from Responsive Classroom and helps you (the teacher) include your students in creating rules in your classroom. 

Every year, we spend the first six weeks of school establishing routines and expectations.  This book helps you guide your students as you create the rules together and make an anchor chart to post for the year. 

Of course, there are many parts to rules including how to follow them...what it should look like, sound like and feel like. 
This video clip shows a real teacher working with her kids!

One of the features include working in cooperative groups to fine tune your work.  I have created a sheet for groups to record their thinking.  You can download it here for free!


Hope you enjoy it!


Monday, August 13, 2012

One more project I have completed...

Have you seen these on Pinterest?  I love this idea that was posted on Confessions of a Teaching Junkie.  These bags are meant to be tied to the back of a student chair and are perfect for holding chapter books!  It has two pockets and can hold several thin books. I love this idea because last year I had a bunch of hard core readers and they always had books stacked up on their desks.  I was looking for a solution...and this is what I decided to try.

Pinned Image

I wanted to copy the idea and so I went to Home Depot and bought these simple nail bags for 88 cents each!


 I love her really cute name tags, but got to thinking....I will have to change those every year, when I get a new student, etc..So, I decided to change it up to a more generic idea and created numbers to cover the logo. 


I had picked up these simple conversation bubbles for $1 at Walmart.  I cut off the bottom of the speech bubble to make it fit on the nail pouch.  I made the numbers in a fancy font (20 of them!) and placed them on the speech bubble.  Cover it up with clear packing tape and it is sturdy and ready to go.

I fastened it to the pocket and used double sided tape rather than Velcro.  It was cheaper and I hope it lasts! 


Wednesday, August 8, 2012

Interactive Modeling...choosing a partner


Do you ever teach your students HOW to choose a partner? What should it look like, sound like and feel like?

Here is a GREAT video that speaks for itself...from Responsive Classroom's YouTube Channel.

Enjoy!


Monday, August 6, 2012

Monday Made it!

Pinned ImageI love ....I mean, I love to store ideas on this site...and occasionally, I get around to actually making these ideas...Today is such a day....

I (like many of you) was intrigued by the idea of these posts... of an objective board like this one by Fourth Grade Frolics.
I like the colorful background and ease of the dry erase markers to post my objectives for the day.

On my hunt for these frames, I noticed that most of the frames were made of glass.  Glass in my classroom = broken.

So I continued my search and found a great solution... Using
mini dry erase boards!  I found a collection at my local Dollar Tree.    I typed up the content area in a fun font, pasted them on a colored background and taped them onto the boards. 
   
This is what an individual board would look like...and this is what it would look like with the objectives written on to it...


I liked these because the back of the boards already came with magnet strips.  The place where I would be hanging these are on an old chalkboard.  This would be perfect!


Next, I needed to make a heading...so I did choose ONE glass frame. 


                                               Put it all together...and it looks like this!


Friday, August 3, 2012

Interactive Modeling...math manipulatives

Responsive Classroom has a few new books out including one on Interactive Modeling (formerly called Guided Discovery).  This is an important teaching tool ALL year, but is especially crucial in the first six weeks of school. 

So what does it mean?  It is the approach you use to teach your expectations.  When I was a child we were told the teachers expectations - one time! It was usually really fast and expected that we knew exactly what she meant, right???  Our kids have changed (or maybe we just understand them better) and now in order for your class to truly run smoothly you need to not only share expectations but also model expectations.  We know to do that in Kindergarten...but do we still do it in the upper grades? 

As I blogged in an earlier post about teaching routines for art supplies, we also need to teach these procedures for math manipulatives as well. 

Several years ago, my team brainstormed together a way to introduce expectations for using math manipulatives.  One of the things that my primary teaching emphasized was the need to have time to "freely explore" materials before you expect them to use them as an educational tool. 

By fourth grade at our school our students have had years of experience of using math manipulatives as tools.  However, there are always students new to the school who have had limited exposure with these tools.  They need to learn how to use them as well as have time to play!  (HINT:  If you don't give them time to play, they will play when you are trying to teach....)

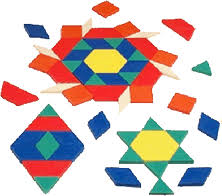
We introduce our math materials on the second day of school.  We pull out our tubs of pattern blocks, multi-links, dice, and unifix cubes.  Each table group gets a tub and a piece of chart paper.  We ask each table to spend about 15 minutes exploring with the materials.  As they explore, we walk around and ask "What can you do with the materials?" "Tell me why you...."

After 15 minutes we ask each table to become the experts of their math materials.  They will use the chart to brainstorm a list of all the ways you can use the materials for math - counting, patterns, measuring, etc... The groups will then bring me the charts and we will go over the uses of each of the tools as a group.  It is at this time that I make my own chart to show how I expect materials to be used and put away. 

1.  Use the materials for math purposes and follow class directions.
2. When you are finished, put the items back in the tubs and but them in the spot on the shelf where you got them.

(I would have pictures, but my math shelves are in the hallway at school right now as they are cleaning my classroom - we still have a month off!)

Simple, direct and no secrets....One thing I have learned over the years is never assume that the kids know what to do...and they DO NOT learn it the first time!

Hope this helps you this year!